Winter in the Capital Region hits hard. Fast-moving storms, heavy wet snow, and freeze-thaw cycles punish roofs. A clear plan protects your home and your budget. Use this practical checklist to act fast, avoid bigger damage, and keep your family safe.
When you need professional help, call Elite Contracting. Keep this roofing season guide handy before the first deep freeze.
What counts as a winter roofing emergency in Upstate NY?
A winter roofing emergency is any roof problem that can quickly lead to structural damage, active water intrusion, or loss of heat. In Upstate NY, the most common winter emergencies include:
- Active interior leak during rain, freezing rain, or snowmelt
- Ice dam forcing water under shingles
- Roof sagging under heavy snow
- Fallen tree or limb puncturing the roof
- Gutter collapse pulling on fascia or opening a gap at the eaves
- Wind damage that tears shingles or exposes underlayment
If water is entering the living space, insulation is soaked, ceilings are sagging, or you see structural movement, treat it as urgent.
Weather patterns that make roof problems worse in winter
Upstate NY roofs face unique winter stress:
- Nor’easters: Long-duration snow, wind, and drifting that load the roof unevenly.
- Lake-effect bursts: Quick, heavy bands that drop dense snow in hours.
- Freeze-thaw cycles: Daytime melt and nighttime refreeze drive ice dam formation.
- Mixed precipitation: Snow, sleet, and freezing rain add weight and seal drainage paths with ice.
- Polar cold snaps: Brittle shingles and sealed sealant lines that resist adhering until temps rise.
- High winds: Gusts that lift shingles and drive snow into vents and ridges.
Albany typically sees consistent snow cover from December through March, with the most severe stretches in January and February. Expect multiple freeze-thaw cycles most weeks near the Thruway corridor.
How to spot urgent roof trouble fast
Look for these signs inside and outside:
Interior signs
- Brown rings on ceilings or tops of walls
- Active drips during snowmelt or rain-on-snow
- Wet attic insulation or dark sheathing lines
- Musty odor near exterior walls, especially after a thaw
- Peeling paint near crown molding
Exterior signs
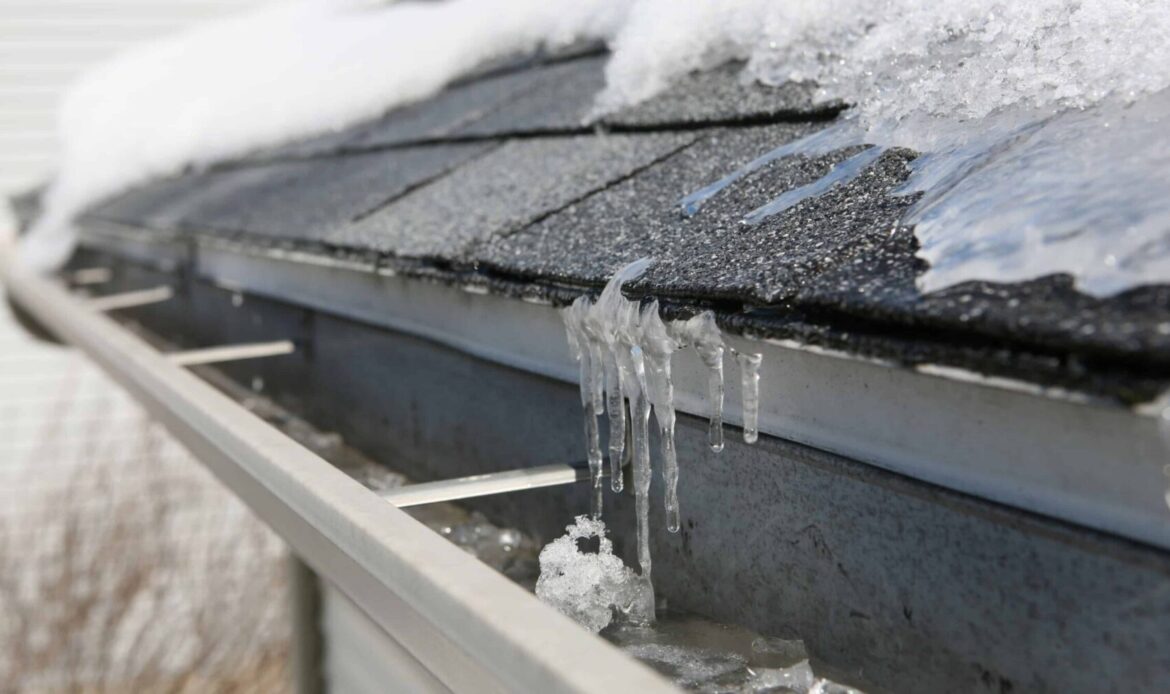
- Thick ridge of ice at the eaves with icicles
- Uneven roof melt patterns above heated rooms, with thick snow remaining at eaves
- Shingles lifted, missing, or torn
- Gutters pulled away or twisted
- Sagging roofline or wavy deck under snow load
- Branches on roof or visible puncture
Use binoculars from the ground. Check the attic with a headlamp after every storm or thaw.
What to do right after a leak, ice dam, or collapse
- Protect people and pets first. Keep children out of affected rooms.
- Shut off power to wet areas if water nears fixtures or outlets.
- Move valuables and electronics. Lay plastic sheeting and buckets.
- Relieve water weight in ceilings by carefully poking a small drain hole into a bubble while holding a bucket below. Wear eye protection.
- Document everything with photos and short videos.
- Call a qualified roofer for temporary mitigation and inspection.
- Start a claim with your insurer if damage appears significant.
Step-by-step emergency response checklists by incident type
Active interior leak
- Contain water with buckets, towels, and plastic sheeting.
- Open the attic hatch. Increase ventilation with a fan to slow moisture buildup.
- Use a wet/dry vac for pooling water. Bag and remove soaked insulation in small areas if safe to access.
- Place a drip diverter in the attic to guide water into a container.
- Call a roofer for a temporary patch or tarp.
- Review this guide on leak signs and first steps: your roof might be leaking.
Ice dam
- Stay off the roof. Do not chip ice with a shovel or axe.
- Rake loose snow off the first 3 to 4 feet of roof from the ground with a roof rake.
- Place socks filled with calcium chloride perpendicular to the ice dam to create melt channels. Avoid rock salt.
- Run a fan in the attic to cool the underside of the roof deck near the eaves.
- Schedule professional steam removal if water is entering the home.
Fallen tree or branch
- Keep people out of the affected area. Structural load may be unpredictable.
- Shut off utilities if lines are impacted.
- Do not remove the branch yourself if it is large or under tension.
- Call a roofer and a tree service for coordinated removal and a temporary dry-in.
- Learn the critical steps for this scenario here: tree falls on your roof advice.
Gutter collapse
- Look for loose sections that could fall. Keep clear.
- Rake roof edge snow to reduce weight and meltwater backup.
- Install temporary downspout extensions or diverters to guide water away from the foundation.
- Schedule rehang or replacement and check fascia integrity.
Heavy snow load or sagging roof
- Check ceilings and doors for new cracks or sticking. Listen for creaks.
- Measure snow depth at several points. Wet snow is much heavier than dry snow.
- Use a roof rake from the ground to reduce load evenly on both sides.
- Call a professional for rooftop removal if depth is high or snow is dense. Do not walk on a snow-loaded roof.
- If movement or cracking appears, evacuate the room and call a pro immediately.
How to safely inspect your roof in winter

- Inspect from the ground with binoculars after every storm.
- Use a stable ladder only on dry, level ground. Have a second person hold the base.
- Wear traction cleats and insulated gloves.
- Open the attic and scan for wet spots using a bright headlamp.
- Feel for damp insulation with a gloved hand. Use a basic moisture meter on sheathing if you have one.
- Never climb onto an icy roof. Call a pro for rooftop inspection.
Common mistakes homeowners make during winter roof issues
- Chipping ice off shingles. This breaks shingles and voids warranties.
- Walking on a snow-covered roof. Hidden skylights and weak spots cause falls.
- Using rock salt on the roof. Salt stains and corrodes materials.
- Ignoring small drips. Slow leaks cause mold and ruin insulation.
- Tarps installed loosely. Wind rips them open and causes more damage.
- Blocking attic vents. Trapped warm air builds bigger ice dams.
- Delaying documentation. Photos and timestamps help insurance.
Prep checklist before roofing season
Get ahead of winter. Stock these items and set up your routine before the first deep freeze and early in roofing season.
Tools and supplies to have on hand
- Roof rake with 16 to 24 foot extension
- Heavy-duty tarps and plastic sheeting
- Plastic leak diverters and 5-gallon buckets
- Calcium chloride pellets and fabric tubes for socks
- Headlamp, extension cords, and a box fan
- Wet/dry vacuum and extra filters
- Gutter scoop, gloves, and safety glasses
- Traction cleats for boots
- Ladder stabilizer and tie-down straps
- Non-contact voltage tester
- Moisture meter for spot checks
- Heat cable for known ice dam trouble spots, installed before snow
Home prep checklist
- Clear gutters and downspouts of leaves and grit.
- Trim branches that overhang the roof.
- Seal small flashing gaps with cold-weather-rated sealant.
- Add insulation above the top plate at exterior walls to reduce ice dam risk.
- Confirm attic ventilation works. Soffit and ridge vents should be open.
- Mark the roof edge with driveway stakes so snow removal crews avoid gutters.
- Save your roofer’s number in your phone. Post it on the fridge.
Temporary fix options that actually work in the cold
These options buy you time until a permanent repair is possible.
- Tarp with strapping: Use a high-quality tarp, 2×4 battens, and screws at the ridge or a high point. Secure edges tight. Do not nail through valleys that carry water.
- Ice melt socks: Fabric tubes filled with calcium chloride cut channels through ice dams.
- Leak diverter: Hang a vinyl diverter from rafters with bungee cords over the drip point, running into a bucket.
- Roof cement in a pinch: Cold-applied mastic can seal small cracks above 40 degrees. Clean and dry the area first if conditions allow.
- Heat cable: Pre-installed heat cable along eaves keeps channels open during mixed precipitation events.
Insurance basics for winter roof emergencies in New York
Most standard homeowner policies cover sudden and accidental damage. Long-term wear, poor maintenance, and pre-existing deterioration are often excluded. These points help when you call your carrier:
- Covered events often include wind, fallen trees, and ice dams that cause interior damage.
- Snow load damage may be covered when collapse or structural damage occurs.
- Your duty to mitigate applies. Take reasonable steps to limit damage, such as tarping and water removal.
- Document everything. Photos, videos, and a log of actions and dates support your claim.
- Keep receipts for emergency services and materials. Temporary repairs are usually reimbursable up to policy limits.
- Ask about additional living expenses if part of the home is unlivable due to covered damage.
Call your agent early. Provide a simple description, the date and time of the event, and initial photos.
What to expect when you call a roofing contractor in cold months
- Triage call: A coordinator asks about active leaks, safety concerns, and access. They prioritize urgent cases with interior water.
- Window of arrival: Winter daylight is short. Crews often schedule arrival windows mid-morning to early afternoon for safety.
- Temporary first: In subfreezing temperatures, permanent shingle sealing may not be possible. Expect a temporary dry-in, then a follow-up repair when temperatures allow.
- Material availability: Ice melt, tarps, underlayment, and flashing are stocked year-round. Certain shingles or special-order parts may require a return visit.
- Clear work area: Move vehicles and clear snow from driveways and walk paths.
- Transparent pricing: You receive a written scope for emergency mitigation and a separate estimate for permanent repairs.
Plan ahead during roofing season if you have known trouble areas so you can get ahead of the first storm.
Documenting damage and photos that help your claim
- Take wide shots of the room and close-ups of wet areas.
- Photograph the ceiling stain progression with timestamps.
- Open the attic and take photos of wet insulation and sheathing.
- Step outside and take photos of the affected roof slope, gutters, and any visible ice dams.
- Record short videos of active drips.
- Save all files in a folder labeled with the date and event name.
Repair vs replacement: how to decide in winter
Use condition, age, and damage type to decide next steps.
| Situation | Repair Now | Plan Replacement | Notes |
|---|---|---|---|
| Localized wind damage, under 10 shingles | Yes | No | Patch and seal when temps allow. Monitor after thaw. |
| Ice dam leak at eaves | Yes, temp mitigation | Maybe | Add insulation and ventilation. Replace rotted sheathing in spring if needed. |
| Fallen limb puncture | Yes, temp dry-in | Maybe | Replace damaged decking and shingles. Check truss alignment. |
| Widespread shingle failure on 20-year-old roof | Temp only | Yes | Schedule full replacement for better weather. |
| Chronic leaks from flashing defects | Yes | Maybe | Reflash now if accessible. Evaluate overall roof age. |
Data snapshot: how much snow is too much?
- Light, fluffy snow weighs roughly 5 pounds per cubic foot.
- Wet, dense snow can weigh 20 to 30 pounds per cubic foot.
- One foot of wet snow can add 20 to 30 pounds per square foot to your roof.
- Many residential roofs are designed for regional snow loads. Uneven loading and drifting can still overload sections.
If you see new cracks in drywall, doors sticking, or visible sagging, reduce load fast from the ground and call a pro.
Winter emergency quick-reference table
| Emergency | Top Risk | First Step | Call Timeframe |
|---|---|---|---|
| Active leak | Mold and electrical hazards | Contain water, power off if needed | Immediate |
| Ice dam | Water intrusion at eaves | Rake 3 to 4 feet of snow, use melt socks | Same day if water is entering |
| Fallen branch | Structural and puncture | Keep clear, document, call pro | Immediate |
| Gutter collapse | Water backup and fascia damage | Rake roof edge, add downspout diverters | 24 to 72 hours |
| Heavy snow load | Localized collapse | Evenly rake from ground | Same day if sagging appears |
FAQs: Upstate NY winter roof emergencies
Can roofers work during freezing temperatures?
Yes. Crews can install temporary dry-ins and many permanent repairs. Adhesive shingles may need warmer temps to fully seal. Expect a follow-up check.
How do I know if an ice dam is forming?
Look for thick icicles, a hard ridge at the eaves, and water stains high on exterior walls or ceilings near exterior walls.
Should I remove all the snow from my roof?
No. Remove the lower 3 to 4 feet to reduce meltwater backing up under shingles. Leave the rest unless a pro removes it safely.
Is attic ventilation really that important?
Yes. Balanced intake and exhaust keep the roof deck cold and limit ice dams. Ventilation also dries minor moisture before it spreads.
What if I cannot see any leaks but have big ice dams?
Act anyway. Rake the roof edge, use melt socks, and schedule professional steam removal if dams persist.
Will insurance cover my ice dam?
Policies vary. Many cover interior water damage from ice dams as a sudden event. Preventive work is usually not covered. Ask your agent.
Do I need a full replacement after a tree strike?
Not always. If damage is localized, a section repair with new decking and shingles can restore performance. A full replacement may be smart for old roofs.
Local winter timeline and maintenance calendar
- Late October to early November: Clean gutters and check flashing. Install heat cable in known trouble spots. Schedule pre-winter inspection during roofing season.
- December: First snows. Confirm your roof rake is ready. Check attic after each storm.
- January to February: Peak freeze-thaw. Manage ice dams with raking and melt socks. Document any stains fast.
- March: Thaws and mixed precipitation. Inspect gutters for damage and plan spring repairs.
- April to May: Permanent repairs and upgrades. Improve insulation and ventilation to reduce next winter’s risk ahead of roofing season.
Pro tips for Albany-area homes
- Cape Cod and story-and-a-half homes often have shallow knee walls. Air sealing and insulation at the top plate are critical to cut ice dams.
- Valleys that face prevailing wind pack snow. Check these after each storm.
- Older 3-tab shingles lose granules faster. Monitor for bare spots after ice removal.
- Low-slope porch roofs collect dense snow. Rake these first.
When to call immediately vs when to monitor
- Call now if water is entering the home, if the roofline sags, or if a tree or large branch is on the roof.
- Monitor if you see small icicles without stains, one or two lifted shingles, or a minor gutter bend. Photograph and recheck after the next thaw.
Budgeting and planning your next steps
- Set aside an emergency fund for mitigation. Tarping and ice steaming have separate costs from permanent fixes.
- Plan upgrades that pay back: air sealing, insulation, and balanced ventilation reduce ice dams and heating bills.
- Schedule spring follow-up for shingles, flashing, gutters, and attic improvements.
Sample homeowner action log
Use this simple format for your records and insurance:
- Event: Jan 12 snow and thaw, leak in dining room.
- Time discovered: 6:10 p.m.
- Immediate actions: Power off, buckets, plastic sheeting, attic diverter, photos.
- Contractor called: 6:45 p.m., arrival next morning, temporary dry-in installed.
- Insurance: Claim opened Jan 13, claim number XXXXXX.
- Follow-up: Steam ice dam Jan 14, reflash eave and valley in spring.
Albany homeowner checklist you can print
- Phone numbers ready: roofer, insurer, electrician, tree service.
- Roof rake accessible near the door.
- Tarps, plastic sheeting, buckets, towels in a labeled bin.
- Calcium chloride and fabric socks in the utility closet.
- Headlamp, gloves, traction cleats in a basket by the back door.
- Ladder stabilizer attached and ladder stored indoors if possible.
- Attic path cleared for quick access.
- Attic fan available for emergency drying.
Final reminders for fast winter decisions
- Contain water first. Dry the space. Then address the roof.
- Do not climb onto an icy roof. Use ground-based tools or hire a pro.
- Document early and often. Photos help with insurance and planning.
- Expect a two-step approach in deep winter. Temporary now. Permanent when the weather allows.
Conclusion
Winter roof emergencies do not wait. Use this checklist to control water, reduce load, and document damage. Keep your tools ready. Book follow-up repairs as soon as roads are clear. When you need expert help, schedule service with Elite Contracting for fast, local support in the greater Albany area.