If a roof leaks, flashing is often the culprit. In Albany’s four-season climate—snow loads, ice dams, spring downpours, and summer heat—your flashing works overtime to keep water out where shingles alone can’t. Whether your home has a chimney, skylights, dormers, or just a simple eave, properly installed and maintained flashing is the quiet hero that protects your sheathing, attic, and interior finishes from costly water damage.
This guide explains how flashing works, why it fails, the warning signs to watch for, and how to make smart decisions about repair versus replacement. If you suspect a leak—or want a proactive, expert inspection—Albany homeowners trust Elite Contracting to diagnose flashing issues correctly and fix them the right way the first time.
roof repair Albany NY: Why Flashing Is Your First Line of Defense
Your shingles shed water, but they can’t close every gap where the roof meets something else. That’s where flashing comes in. Flashing is a system of shaped metal (and specialized components) installed at transition points—anywhere water can find a vulnerable edge or seam. Think of it as a roadmap that tells water exactly where to go: off the roof and away from your home, even in wind-driven rain, freeze/thaw cycles, and heavy snow.
In Albany, where winter storms and spring thaws can challenge even well-built roofs, quality flashing prevents water from sneaking behind shingles and into your home’s structure. If your flashing is missing, bent, corroded, improperly overlapped, or sealed with the wrong materials, it’s not a question of if water gets in—it’s when.
What Roof Flashing Is and How It Works
At vertical walls and dormers: Step and counterflashing
Where a sloped roof meets a vertical wall (siding, brick, or stone), step flashing is installed in an overlapping, stair-step pattern along each shingle course. Proper step flashing directs water over the shingle below, never behind it. On masonry, counterflashing is cut into (or regletted into) the mortar joint and folds down over the step flashing, sealing the joint and preventing capillary action or wind-driven rain from getting behind.
At chimneys: A full system with saddle/cricket
Chimneys are classic leak zones because they interrupt the roof plane on two or more sides. A complete system includes base flashing, step flashing along the sides, counterflashing inserted into the mortar, and a saddle (or cricket) behind wide chimneys to divert water around the masonry. Without a cricket, water and debris pile up behind the chimney, leading to accelerated wear and leaks.
At skylights, vents, and pipes: Integral flashing and boots
Skylights typically rely on a kit that includes head flashing, step flashing, and sill flashing tailored to the unit. Vent pipes require boots that seal around the pipe and tie into the shingle courses, while roof vents have their own flashing flange concealed under the shingles above and lapped over the shingles below.
At valleys: W- or V-style valley flashing
Roof valleys concentrate water runoff. Open valleys often use pre-bent metal flashing in a W or V profile that channels water. In closed-cut valleys, shingles are cut to direct water, but underlying valley lining (often metal or self-adhered membrane) is still critical. Poorly installed valleys are frequent leak origins.
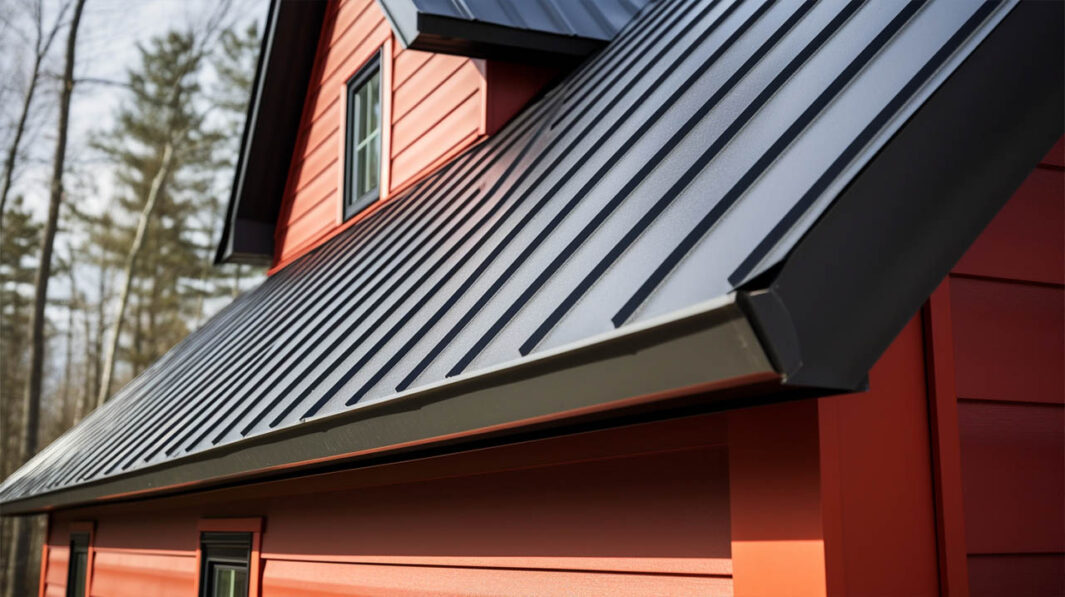
At edges: Drip edge and eave protection
Drip edge flashing at eaves and rakes prevents water from curling under shingles and damaging the fascia. It also supports starter shingles and improves runoff control in wind and ice. In Albany’s climate, drip edge partnered with ice-and-water shield is a must-have defense.
Why Flashing Failures Are a Leading Cause of Leaks
Shingles are forgiving. Flashing is not. When flashing is wrong, water finds a path. Common failure modes include:
- Improper overlaps: Step flashing and valley metal must overlap correctly (at least 2 inches is common). Short laps let water drive under in wind and ice.
- Missing components: Counterflashing skipped on chimneys or kick-out flashing omitted where a roof meets a wall can let water run behind siding.
- Sealant dependency: Caulks and mastics are not a substitute for proper metal overlaps. Sealants are temporary and degrade with UV, cold, and movement.
- Corrosion and rust: Galvanized or aluminum flashing near dissimilar metals (like copper) can corrode. Rust holes in valley metal are leak triggers.
- Mechanical damage: Ice slides, fallen limbs, ladder placement, or foot traffic can dent or pull flashing loose.
- Wind uplift: High winds can lift shingles and loosen flashing nails, opening gaps water exploits.
Because flashing sits at critical intersections, even small defects can channel water into the home’s structure, often far from the source, making leaks hard to trace without a trained eye.
Albany Climate Impacts: Freeze/Thaw, Snow, and Ice Dams
Albany’s winters introduce a tough combination: deep cold, repeated freeze/thaw cycles, and significant snowfall. Here’s how that affects flashing:
- Freeze/thaw cycling: Meltwater seeps into tiny gaps at flashing joints, then freezes and expands, prying open larger pathways.
- Ice dams: Heat loss at the roof deck melts snow, water runs down to cold eaves, freezes, and forms a dam. Water pools and can back up under shingles and over the top edge of drip edge or step flashing.
- Heavy snow loads: Persistent snow presses on valleys and around chimneys. When it melts, concentrated runoff tests every overlap and seam.
- Wind-driven rain: Nor’easters push water uphill, so flashing must be layered with shingle courses to resist reverse flow.
- UV and summer heat: Sealants and rubber boots oxidize and crack, especially on south- and west-facing roofs.
Because of these stressors, Albany-area roofs need flashing that’s properly sized, overlapped, fastened, and sealed, with materials chosen for longevity in cold and wet conditions.
Warning Signs of Flashing Failure
Catch problems early by looking for these red flags inside and out:
- Water stains on ceilings or walls, especially near exterior walls, chimneys, or skylights
- Peeling paint, bubbling drywall, or persistent musty odors
- Attic signs: darkened sheathing, damp insulation, or visible daylight around penetrations
- Exterior rust streaks, staining on masonry near chimneys, or deteriorated mortar
- Gaps where step flashing meets siding or shingles
- Cracked, dry, or missing sealant where counterflashing meets masonry
- Damaged or missing kick-out flashing at the bottom of roof-to-wall intersections
- Curled shingles or granule loss localized near valleys or walls
If you see any of these, address them promptly. Small flashing issues can escalate into widespread rot and mold.
How Damaged Flashing Affects Long-Term Roof Performance
Flashing problems rarely stay small. Over time, water intrusion can:
- Rot roof sheathing and rafters, undermining structural integrity
- Compromise insulation, lowering R-value and raising energy bills
- Trigger mold growth in attics and walls, affecting indoor air quality
- Stain ceilings and walls, leading to costly interior repairs
- Shorten the lifespan of shingles adjacent to the leak area
Because flashing is concentrated at key intersections, damage often spreads laterally along valleys and wall lines. What starts as a simple step-flashing fix can evolve into sheathing replacement if ignored.
Roof Flashing Types and Materials That Work in Upstate NY
Step flashing
Individual L-shaped pieces interlaced with each shingle course along sidewalls and dormers. Durable step flashing with proper overlap is the gold standard for roof-to-wall transitions.
Counterflashing
Installed over base or step flashing on masonry, inserted into a reglet cut in mortar joints for a watertight seal. Proper counterflashing eliminates reliance on caulk-only seals.
Valley flashing
Preformed W- or V-shaped metal channels water down the valley. In Albany, pairing metal valley flashing with ice-and-water shield beneath provides robust backup protection.
Drip edge
Metal flashing at eaves and rakes that directs water away from fascia and into gutters. It also prevents capillary action and wind-driven rain from getting under shingles.
Pipe boots and vent flashings
Rubber, silicone, or lead boots seal around circular penetrations. Quality boots resist UV cracking; some designs include reinforced collars for longevity.
Chimney saddles (crickets)
Built-up, flashed structures that split water around wide chimneys on the uphill side, preventing pooling and debris buildup.
Best materials for Albany conditions
- Aluminum: Lightweight and corrosion-resistant in many scenarios, but can corrode when in contact with dissimilar metals; thicker gauges perform better.
- Galvanized steel: Strong and cost-effective; the zinc coating resists rust, but cuts and scratches must be protected; good all-around choice when properly detailed.
- Copper: Premium option with excellent longevity and soldered seams; ideal for chimneys and high-visibility areas; higher upfront cost but long-term value.
- Stainless steel: Highly corrosion-resistant; used in harsh environments or where longevity is paramount.
- Lead boots: Durable and form-fitting around pipes; long-lasting but must be installed correctly to avoid deformation and animal damage.
Selecting the right material depends on budget, roof design, and nearby metals to avoid galvanic corrosion. What matters most is correct design, overlap, fastening, integration with underlayments, and compatibility with the roofing system.
Flashing, Roof Age, and Workmanship Quality
Flashing is a workmanship litmus test. Quality installers detail each transition properly and rely on overlaps—not caulk—to keep water out. Common shortcuts include reusing old flashing (especially on roof replacements), skipping kick-out flashing, relying on roofing cement instead of metal, and pinching counterflashing too tight against step flashing (which traps water).
Roof age also matters. On roofs older than 15–20 years, flashing metal can reach the end of its service life, especially in valleys and around chimneys where corrosive conditions persist. Rubber pipe boots often crack in 8–12 years under UV exposure. If you’re seeing telltale stains or rust, it may be time to update the flashing system even if the shingles still look acceptable from the ground.
Repair vs. Replace: Making the Right Call
When a spot repair makes sense
- Localized damage: A single cracked pipe boot or a few loose step flashing pieces near a dormer
- Sound surrounding materials: Solid sheathing, healthy shingles, intact underlayment
- No widespread corrosion: Metal is largely clean and stable
In these cases, targeted work—replacing the damaged component, correcting overlaps, adding a missing kick-out, or reworking a short section of step flashing—can restore watertight performance.
When to replace sections of flashing
- Corroded or rusted valley metal
- Improper design (e.g., no counterflashing in masonry, no cricket behind a wide chimney)
- Chronic leaks along a wall where step flashing was not interwoven with shingles
Replacing entire runs is more reliable than patchwork because it resets the system with correct layers and terminations.
When full roof replacement is smarter
- Shingles are at or near end-of-life and multiple flashing areas are failing
- Widespread sheathing rot from long-term water intrusion
- Numerous penetrations, dormers, and complex intersections that need a holistic reset
When you’re planning a larger project, it’s smart to consider a complete replacement strategy that sequences underlayment, ice-and-water shield, drip edge, and flashing upgrades together. For a deeper look at planning the process, see this guide to roof replacement strategy, which applies broadly to Albany-area homes as well.
Professional Inspection: Finding Problems You Can’t See
Flashing leaks can be tricky. Water may travel along rafters or vapor barriers and show up far from the origin. A professional evaluation typically includes:
- Exterior walk-through or drone assessment to examine valleys, walls, penetrations, edges, and kick-outs
- Attic inspection for moisture stains, mold activity, ventilation issues, and daylight at penetrations
- Targeted moisture readings and thermal imaging to trace hidden paths
- Photo documentation and a prioritized repair plan
If you need a clear, actionable assessment, schedule a trusted roof repair Albany NY inspection that evaluates your flashing system end to end, not just the visible leak point.
What Quality Flashing Installation Looks Like
Good flashing is a system, not a smear of caulk. Hallmarks of quality include:
- Step flashing sized and lapped correctly: Each piece lapped at least 2 inches over the one below, with nails placed high and into the roof deck, not the vertical wall.
- Counterflashing on masonry cut into a reglet and sealed with compatible sealant; never just surface-applied.
- Kick-out flashing at the base of roof-to-wall intersections to divert water into the gutter, not behind siding.
- Valley metal centered, hemmed edges (to stiffen and reduce water creep), and ice-and-water shield underneath.
- Drip edge installed under the underlayment at the rakes and over the underlayment at the eaves, with adequate overlap at joints.
- Boots that match pipe size, properly integrated with shingles and sealed with compatible products.
- Underlayment strategy that supports flashing performance: ice-and-water shield at eaves, valleys, and penetrations to back up the metal.
To get consistent, durable results from roof repair Albany NY, verify that your contractor specifies materials and methods in writing.
How to vet a local contractor
- Local experience: Ask for Albany-area projects featuring chimneys, dormers, and valleys similar to your home.
- Material details: Request the flashing metal type and thickness, boot brands, and underlayment plan.
- Photo evidence: Before/after and in-progress photos that show the layering (not just finished shingles).
- Warranty clarity: Separate workmanship warranty from manufacturer materials coverage.
- Communication: Clear explanation of where and why flashing will be replaced, and how it interfaces with existing siding or masonry.
Clear scope and photo documentation build trust and ensure you get the long-term performance you’re paying for in roof repair Albany NY.
Flashing as Part of Preventative Maintenance
Flashing performs best when you find and fix small issues early. Incorporate it into a simple maintenance plan:
- Seasonal checks in spring and fall (and after major storms)
- Gutter cleaning to reduce water overflow at eaves and valleys
- Visual checks of pipe boots, valley metal, drip edge, and kick-out flashing
- Attic inspections for early signs of moisture
For a step-by-step annual routine tailored to our climate, explore these roof maintenance tips for Albany homeowners. Building a habit of inspection and small fixes keeps your flashing in top shape and reduces the need for emergency roof repair Albany NY.
When Flashing Is Assessed During Roof Replacement
During a full replacement, experienced crews evaluate and typically replace critical flashing components, including step and counterflashing, valley metal, drip edge, pipe boots, and chimney crickets where needed. Integrating new flashing with fresh underlayment and shingles delivers a weather-tight “reset” that outperforms piecemeal patches.
Planning your scope ahead of time helps control costs and avoids surprises. For insights on how to sequence decisions and budget wisely, read this guide on roof replacement strategy.
Common Flashing Mistakes to Avoid
- Relying on caulk instead of proper metal overlaps and counterflashing
- Skipping kick-out flashing at roof-to-wall transitions
- Reusing old flashing during a roof replacement “to save money”
- Mixing dissimilar metals without considering galvanic corrosion
- Nailing through exposed areas of valley metal, creating leak points
- Leaving inadequate overlaps or underlayment coverage around penetrations
FAQs: Quick Answers for Albany Homeowners
How long should flashing last?
It depends on the material and exposure. Aluminum and galvanized steel often last 20–30 years when detailed correctly; copper can outlast the shingles. Rubber boots may need replacement sooner—often within 10–15 years.
Can I just caulk a leaking flashing area?
Caulk can be a temporary emergency measure, but it’s not a lasting solution. Proper repairs re-establish correct overlaps and, on masonry, install true counterflashing cut into the mortar.
Do I need a chimney cricket?
On wider chimneys (generally 30 inches or more), a cricket is strongly recommended in snowy climates to divert water and prevent debris buildup that accelerates leaks.
Is drip edge required?
Drip edge is a best practice in our climate and critical for protecting eaves and rakes. It reduces wind-driven rain intrusion and guides water into the gutter system.
Can I replace flashing without replacing shingles?
Yes, in many cases. Step flashing replacements require lifting nearby shingles and weaving new pieces, which is feasible if the shingles are in good condition. Severely brittle or aged shingles may complicate repairs and argue for broader replacement.
Conclusion: Protect Your Home with Smart Flashing Decisions
Flashing is the unsung hero between a tight, dry home and the costly headaches of water damage. In Albany’s challenging climate, small defects at chimneys, valleys, walls, and edges escalate quickly if left alone. A professional inspection that focuses on flashing details, followed by precise repairs or a well-planned replacement, delivers the best return on your roofing investment.
Ready for clear answers and reliable workmanship? Schedule your inspection with Elite Contracting and take the next step toward a leak-free, long-lasting roof.